Jewelry Photo Retouching: A Complete Guide to the Hardest Product Category
Jewelry Photo Retouching: A Complete Guide to the Hardest Product Category
A studio guide to jewelry retouching: how to make small, shiny, valuable pieces sell.
Jewelry is one of the hardest categories in product photography. Polished metal picks up reflections of the whole room, stones change color with the light, and the buyer judges an expensive item by tiny details that have to be flawless. Below we break down why jewelry photos are so difficult and how they are brought to a listing that sells instead of scaring people off.
This is a walkthrough of the approach, not a universal recipe: jewelry has its own traps, and most of them are solved at the retouching stage. We go through the whole path in order: what happens to light on metal and inside a stone, what is worth fixing on set, which steps the edit consists of, how a ring differs from a chain or a watch, how much time and money it takes, and where the line between a neural network and a retoucher's hand runs today.
Before and after: what the difference looks like
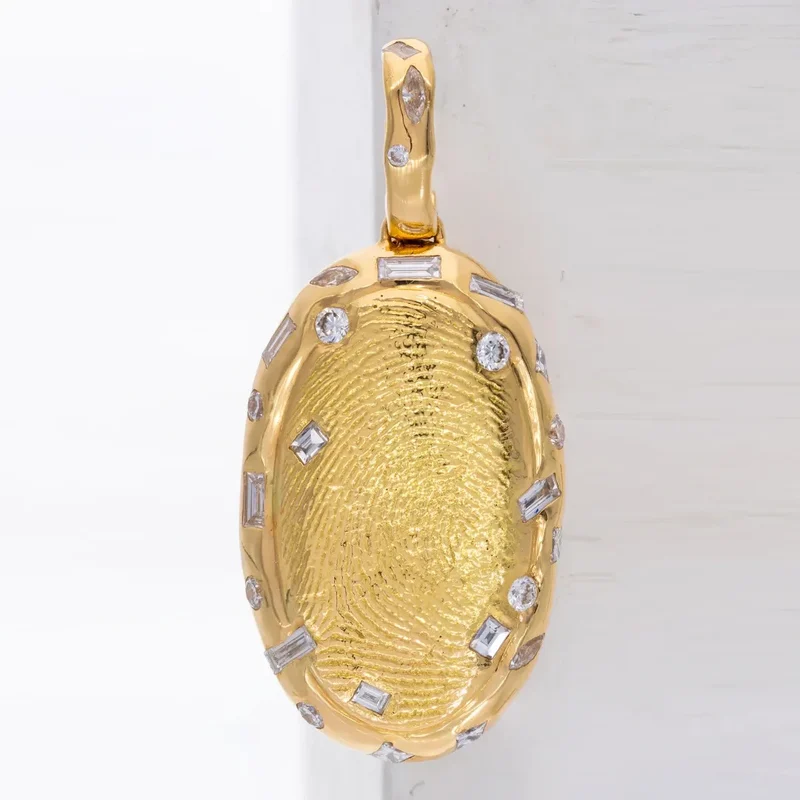
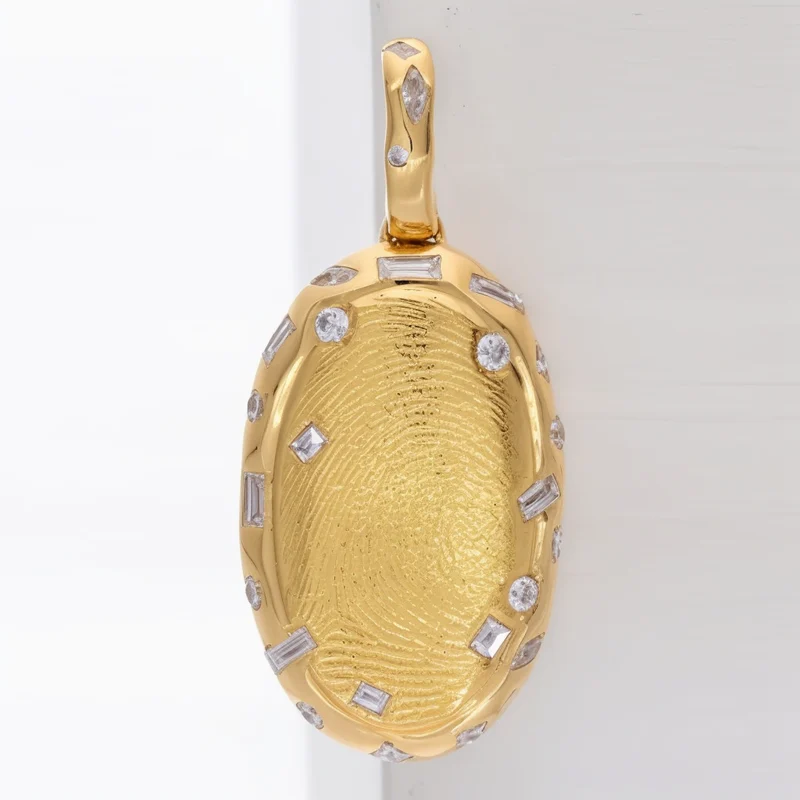
A yellow gold pendant with stones. On the left is the frame from the camera: a gray textured background, a shadow from the stand, a color cast in the highlights. On the right is the result: a clean background, even metal color, readable stones. Drag the slider.


Source frame on the left, retouched on the right.
- Before and after
- The essentials in one minute
- Glossary
- Surface types
- Metal color
- Stones
- Which frames a listing needs
- What to do on set
- Retouching step by step
- Rings, earrings, chains, watches
- Working with a catalog
- Three typical walkthroughs
- Try it on your photo
- AI: what it can do and where it fails
- How much it costs
- How to brief a retoucher
- Acceptance checklist
Who this guide is for
- Jewelry sellers on marketplaces and in their own online store. You will understand what you pay a retoucher for, how to brief the job and how to accept the result.
- Jewelers and small workshops. If you shoot your pieces yourself, there is a list of what can be fixed on set for free and what will go to post-production anyway.
- Photographers and beginner retouchers. The order of operations, typical mistakes and techniques that save hours.
In short: the essentials in one minute
- A piece of jewelry in a photo is made of reflections. Polished metal has no pattern of its own, we see on it whatever stands around. That is why half of the result is decided on set: the cleaner the surroundings, the less work later.
- Jewelry retouching always goes in the same order: reading the frame, cleanup, reflections, color, stones, volume, background and shadow, sharpening and export. You can swap steps, but every skipped one shows up in the close-up.
- Color matters more than drama. Yellow gold that drifted to green, or white gold with a yellow cast, reads to the buyer as a cheap piece or as deception. That is where returns come from.
- Neural networks are good at removing backgrounds and small dust, but they do not understand how a stone's facets work or which reflection on the metal is real. The final pass on jewelry is still done by hand.
- A simple ring without stones takes a retoucher 10-20 minutes, a complex piece with pave or a watch on a bracelet can take an hour or more. That is what the price depends on.
Glossary: words you will meet below
Jewelry photography and retouching borrow a lot of workshop terms. Here are the ones you need to explain what exactly has to be fixed.
- Shank. The band of a ring, the part that wraps around the finger.
- Setting. The mount that holds the stone.
- Prongs. Thin claws that keep the stone in the setting.
- Stone setting style. The way the stone is fixed in the metal. It defines how many small details surround the stone.
- Pave. A surface fully covered with small stones set close together.
- Table. The flat top facet of a cut stone. This is where the lens is most often reflected.
- Cabochon. A stone without facets, with a smooth domed surface.
- Ear wire. The part of an earring that goes through the ear, together with its clasp.
- Satin finish. A matte metal surface with fine parallel lines.
- Oxidation. A dark finish in the recesses of silver that brings out the pattern.
- Rhodium plating. A thin layer of rhodium that gives white gold and silver a cool, bright shine.
- Focus stacking. Merging several frames with different focus points into one image that is sharp through its whole depth.
- Flag. A black or white card placed next to the piece. It is reflected in the metal and draws its shape.
What we call a good jewelry photo
To speak the same language further on, let us agree on the criteria. A good jewelry photo for a product listing answers five buyer questions without a single word.
- What it is made of. Metal reads as metal, not as gray plastic. You can tell gold from silver and a polished surface from a matte one.
- What color it really is. The shade of the metal and the stone matches the piece the customer will take out of the box.
- What volume it has. Highlights and shadows follow the form, a ring looks round, not flat.
- How neat it is. No dust, lint, fingerprints or try-on scratches. At the same time the real texture is kept: engraving, oxidation, the cut of the stone.
- What size it is. At least one frame gives a clear sense of scale: a hand, a neck, a ruler or a caption with dimensions.
If the photo answers all five, the retouching is done right, even when it is invisible. If even one answer is missing, the buyer either goes to the next listing or buys and returns. Next we look at where the difficulties come from and how they are removed one by one.
Why jewelry is the hardest category
- Reflections. Polished metal is a mirror: it shows the window, your hands, the whole room. Automation cannot tell a real highlight from a reflection of clutter.
- Metal and stone color. Gold has to be gold, silver has to be cool, the stone has to be the exact shade. The smallest color shift makes the piece look cheaper.
- Small details. Scratches, dust and fingerprints on polished surfaces are visible in close-up and need cleaning.
- Background and shadow. A small object should float on a clean background with a tidy shadow or reflection, with no dirt along the edges.
That is the short version. Now in detail, because there is physics behind each point, and it helps both the person who shoots and the person who accepts the work.
Surface types: mirror, matte and mixed
Jewelry is not uniform. One piece almost always combines several surface types, and each behaves differently in light.
Polished, or mirror. A plain wedding band, the shank of a signet ring, the links of a curb chain. Such a surface does not scatter light, it reflects it at the same angle it arrived. It has no pattern of its own: everything we see on polished metal is a reflection of the softbox, the ceiling, the tripod and the photographer. A black stripe on a ring is not a defect of the metal, it is the reflection of a dark corner of the room. Hence the main rule of jewelry photography: we light not the object, but what is reflected in it.
Matte and satin. Brushed metal, enamel, opaque stones like turquoise or coral, pearls. They scatter light evenly and show almost no hard highlights. But a matte surface reveals every piece of lint and every speck, and careless cleaning turns the texture into a flat fill, so the piece looks painted.
Transparent and faceted. Diamonds, sapphires, topaz, cubic zirconia. A stone works as a set of tiny mirrors and prisms: some facets send light out and burn white, some fall into darkness, some show color. A live stone in a photo is always contrasty, with both nearly white and nearly black facets. If you even them out, the stone turns into glass.
Mixed. Most real pieces. A diamond ring: a mirror band, a matte inner side, a faceted stone, small prongs holding it. Oxidized silver: polished high points and dark matte recesses. You cannot apply one technique to the whole frame here. On the mirror we build clean reflections, on the matte part we remove dirt and protect the texture, in the stone we keep the contrast of the facets.

Where dirty reflections come from
Even in a good studio the frame is rarely clean straight away. This is what usually ends up on polished metal.
- The camera and lens. A dark spot in the center of the piece, especially on convex shapes. A sphere or a cabochon reflects almost the whole room, there is nowhere to hide.
- Seams and corners of the light tent. Thin gray lines repeated on every link of a chain.
- Color casts. The photographer's red sweater, a yellow wall, a blue phone screen. On white gold and silver any color nearby shows up at once.
- Double and torn highlights. From two sources without diffusion or from crumpled paper used as fill.
- Holders. Wax, putty, fishing line, tweezers, a stand. The piece has to be positioned somehow, and almost everything used for that is later removed in retouching.
Some of these problems take a minute to solve on set, and that is always cheaper than later. But perfectly clean source files do not exist: a small object is shot at high magnification, and it shows what the eye never notices in real life.
Metal color: where mistakes happen most
Jewelry buyers are very sensitive to shade. They may not know the words "white balance", but they instantly see that the gold in the photo is "somehow off". Each metal has its own character, and the retoucher keeps it in mind.
- Yellow gold. A warm yellow with no green and no orange. The most common mistake: the camera pulls it toward a greenish or muddy brown tone, especially in the shadows. The second one: oversaturation, when gold looks like candy foil.
- Rose gold. An alloy with a noticeable share of copper, most often 14K. The shade is warm and pinkish, but not orange. It is easy to confuse with yellow gold in a photo if the retoucher "corrected" the color without looking at the piece.
- White gold and platinum. A neutral light metal, slightly warmer than silver. It should not go yellow or blue. Rhodium plating gives a very clean, cool shine.
- Silver. Cool and light, with deep shadows. In bad light it turns into gray aluminum and the piece immediately looks cheaper. Oxidized silver needs the contrast between polished high points and dark recesses preserved.
- Steel and titanium. Darker and drier than silver. The task is the opposite: do not make them too light and dressy, or the customer gets something different from what they saw.
A separate problem is when pieces of the same metal look different within one catalog: one ring is yellow, another has an orange cast, the third is pale. For a store this is worse than a single small inaccuracy, because the buyer stops trusting all the listings at once. So when a series is processed, the metal color is brought to one reference.


Stones: transparent, opaque and pearls
A stone in a photo almost never looks the way it does in the hand. In life we tilt the piece slightly and the facets flash one after another. In a still image that moment is frozen, and often it is caught badly: the stone is dark, flat or has the lens reflected in its table.
- Colorless faceted stones. Diamonds, cubic zirconia, moissanite. They need contrast and clean white flashes on the facets. A gray diamond without a single bright highlight looks like cloudy glass.
- Colored transparent stones. Sapphire, emerald, ruby, topaz, amethyst. The main risk is the shade: sapphire goes black, emerald goes bottle green, ruby goes pink. Saturation is raised carefully and only where the stone glows, without touching the setting.
- Opaque stones. Onyx, turquoise, malachite, coral. What matters here is an even tone, a natural pattern and one neat highlight that shows the shape of the cabochon.
- Pearls. They have a soft inner glow and a barely visible iridescence. A hard white highlight and heavy cleaning turn a pearl into a plastic bead. Usually the highlight is softened and the form is shown with a smooth transition from light to shadow.
- Melee and pave. Dozens of small stones in a row. Each has to sparkle, but not identically: the same highlight in every stone gives the retouching away immediately.


Scale and sharpness
A ring on the buyer's screen is several times bigger than in life. Everything that distance hides in a shop window comes to the front in a photo: lint from a cloth, a try-on scratch, a trace of polishing compound in the corner of a setting, a speck of dust on the stone.
The second scale problem is depth of field. In macro shooting only a layer a couple of millimeters thick is sharp. The front of the ring is in focus, the back is blurred. Sometimes that is beautiful, but a product listing usually needs the piece to read as a whole. The photographer solves this with focus stacking: shooting several frames with different focus points and merging them. The merge leaves traces: halos along the contour, doubled fine details, areas where sharpness "jumped". The retoucher removes those too.


Background and shadow
Marketplaces and catalogs most often expect a clean light background. In practice the "white" from the camera comes out gray, with a gradient, a shadow from the stand and traces of wax under the piece. You cannot simply blow it out with curves: the light edges of silver and white gold will burn together with the background, and the ring will lose its outline.
So the piece is first carefully separated from the background, and the shadow is built separately. Without a shadow the piece looks pasted in, with a dirty shadow it looks sloppy. Usually one of three solutions is chosen: a soft contact shadow under the piece, a light mirror reflection as on glass, or no shadow at all for strict catalog frames. The main thing is to keep the same solution across the whole series.


What marketplaces require
Marketplace requirements change, so before a big batch it is always worth opening the current rules for your category. But the general logic stays the same from year to year.
- The main image shows the product itself, large, on a neutral background, with no extra objects covering it. Amazon, for example, expects a pure white background for the main image.
- The piece fills most of the frame instead of getting lost in the middle of an empty field.
- The color in the photo matches the real one. For jewelry this is a separate reason for returns and "not as described" claims.
- File size and aspect ratio are adjusted to the specific platform so the listing is not cropped in search results.
- Additional frames answer questions: side view, clasp, hallmark stamp such as 925 or 14K, the piece on a hand or a neck for scale.
Which frames a jewelry listing needs
One beautiful photo is not enough for jewelry. The buyer cannot turn the piece in their hands, and a set of frames replaces that. Each has its own job, and the retouching for each is a little different.
- Main image. The whole piece, large, on a clean background, from its best angle. It is seen in search results at the size of a matchbox, so silhouette and clean color matter most.
- Second angle. Side or three-quarter view. Shows how high the stone sits, the thickness of the shank, the profile of the piece.
- Macro. A close-up of the stone, the setting, the texture, the weave of the chain. Retouching is at its most demanding here: at this magnification everything shows.
- Clasp, lock, ear wire. The buyer wants to understand how secure and comfortable it is.
- Hallmark stamp. Proof of the metal. The stamp must stay readable, it must not be smoothed away during cleanup.
- Scale. The piece on a hand, on a neck, in an ear. Without this frame people misjudge the size and often get it wrong.
- Packaging. Important for gift purchases, and jewelry is given as a gift more often than bought for oneself.

When the whole set is processed in one style, the listing looks solid and builds trust. When the main image is polished and the rest are shot on a phone by the window, the buyer senses a catch, even if they cannot put it into words.
On-model frames: skin and metal in one shot

A photo of jewelry on a person is a special case, because two kinds of retouching with different rules meet in it. Skin needs softness and preserved texture, metal needs cleanliness and contrast. Light that flatters a face is usually bad for polished metal, and the other way round.
In practice such frames are processed in two passes. Skin first: temporary blemishes are removed, the tone is evened out, pores and natural texture are kept. Hands for rings and bracelets are cleaned more thoroughly than a face, because the frame is close: cuticles, redness, fine hairs. Then the jewelry: it is corrected through the same steps as a product shot, only more carefully with reflections, because now the skin is reflected in the metal, and that warm reflex is exactly what has to be preserved. Without it the piece looks pasted onto the hand.
The main mistake here is making the jewelry brighter and sharper than the overall light of the frame allows. It starts to "glow" separately from the person. The right result is when the eye goes to the piece first but does not notice that it was processed separately.
From this follows the conclusion that defines the whole process below: jewelry retouching is not decoration. It is bringing the frame to a state where the piece looks as good as it does in the hand, and stays honest.
How it is done
- Shooting with controlled reflections. A dome or a light tent kills the reflections of the room; some still remain for retouching.
- Cleaning the polish. Remove dust, scratches and fingerprints while keeping the shine and texture of the metal.
- Color. Set the exact shade of the metal and the stone against a reference so the photo matches the real piece.
- Highlights and volume. Keep the "right" highlights that give form and remove the dirty ones that break it.
- Background and shadow. A clean background that meets the platform's rules, a neat shadow or reflection for volume.
Jewelry is where the difference between automation and a human shows best: a neural network gives a plausible result, not an exact one, and on an expensive product the price of a mistake is a return.
Now each step in detail, with tools and typical mistakes.
What to do on set so retouching costs less
Retouching does not replace light. It removes what could not be removed on set. The cleaner the source, the faster and cheaper the edit and the more natural the result. This is what photographers who shoot jewelry regularly use.
- A light tent, dome or cone. A translucent volume around the piece. Light passes through the walls and becomes soft, and the polished metal reflects an even white surface instead of the room. It is the simplest way to get clean metal. The downside: in a completely white environment metal turns flat and loses contrast, so a tent alone is not enough.
- Black flags. Strips of black card or fabric placed next to the piece. They are reflected in the polish as dark lines and draw the edge of the form. A white ring on a white background simply disappears without black reflections, a flag gives it back its outline.
- White reflectors. Sheets of foam board, paper or plastic. They fill in the shadows and give a long even highlight along a shank or a link.
- Diffusers. Tracing paper, frosted plastic, diffusion fabric between the source and the piece. The bigger and closer the diffuser, the softer the transition from highlight to shadow.
- A point source for stones. Diffused light is good for metal, but stones "sleep" in it. A small hard source from the side or above lights up the facets. Often two frames are shot, one for the metal and one for the stone, and combined later.
- A tripod and a macro lens. Without a tripod you get neither a focus stack nor a series with the same angle.
And a few habits that cost nothing but save hours of work.
- Wipe the piece before every frame. Microfiber for metal, a blower or a brush for dust in the settings. One minute on set replaces fifteen in the editor.
- Work in cotton gloves or hold the piece with soft-tipped tweezers. A fingerprint on polished metal is more visible than a scratch.
- Remove color from the room. Bright clothes, colored walls and screens are reflected in metal. Black or gray clothing on the photographer is a working tool.
- Shoot in RAW. It keeps headroom in the highlights and lets you correct white balance precisely.
- Put a gray card or a color target in the first frame. With it the retoucher sets neutral color for the whole series in seconds.
- Keep one angle and one scale for similar pieces. Then the edit of one frame can be carried over to the rest.
- Fix the piece so the holder is easy to remove: thin fishing line, a drop of wax behind the piece, not in front of it.
Lighting for different metals and stones
There is no universal setup, but there are working starting points. They are worth knowing for the client too: one look at the source tells you how much work is left for post-production.
- Yellow and rose gold. Soft light from above and from one side through a large diffuser, a white reflector on the other side, one or two black flags for the contour. Warm metal loves long smooth highlights. Hard point light makes it blotchy.
- Silver, white gold, platinum. The same setup, but with more black flags. Light metal on a light background needs dark reflections along the edges, otherwise it dissolves. The surroundings must be strictly neutral: any colored object nearby adds a tint.
- Matte and satin surfaces. Light at a low angle to the surface, to bring out the grain. Frontal light makes a satin finish flat.
- Faceted stones. A small hard source is added to the diffused light. It is moved until several facets light up in the stone. Usually this is a separate frame that is later combined with the main one.
- Cabochons and pearls. One large soft source, so the dome gets one neat highlight with a soft edge instead of a scatter of small ones.
- Oxidation and engraving. Raking side light brings out the relief. From above the relief disappears.
If the shoot has not happened yet and you are only planning it, show the photographer an example of a frame you like in advance. It is the shortest way to agree on the light.
Step 1. Reading the frame and making a plan
Good retouching starts not with a brush but with two minutes of looking. The retoucher opens the frame at one hundred percent and answers a few questions. Which metal is it and what shade should it be. Which surfaces are mirror and which are matte. Which reflections are real and work for the form, and which are junk. What about the stones: are they alive or dark. Is there a focus stack and its traces. What background, shadow and final size are needed.
Then the RAW file is developed: white balance is set by the gray card, detail is recovered in the highlights, shadows are lifted slightly, chromatic aberration along the contour is removed. It is important not to push contrast and sharpness at this stage: everything amplified in the converter will have to be cleaned in greater volume later.
Step 2. Cleanup
The longest and the least visible stage. Dust, lint, fingerprints, fine scratches, traces of polishing compound, glue and wax from the mount are removed.
The work is done on a separate empty layer so any correction can be undone. The main tools: the Spot Healing Brush for single dust specks, the Healing Brush and the Clone Stamp for areas near edges, the Patch tool for large uniform areas. Near the edge of the metal and around stones the spot brush often "pulls in" the neighboring tone and leaves dirt, a stamp with a harder edge is more reliable there.
The main rule of cleanup: remove the accidental, keep the real. A dust speck is accidental, engraving is real. A try-on scratch is accidental, the line of a satin finish is real. If you smooth everything, metal turns into plastic. A good reference point: after cleanup the surface should look like a new piece from the workshop, not like a 3D model.
Step 3. Reflections and the shape of the metal
This is what separates jewelry retouching from any other kind. When a reflection on polished metal is dirty, it is not cleaned spot by spot, it is rebuilt: the surface is selected along its contour and a smooth transition from light to shadow is drawn on it again.
It is done like this. An area, for example the outer side of a ring shank, is outlined with the Pen tool. Inside the selection a light band is laid with a soft brush or a gradient where the highlight should be, and a dark one where the form turns away from the light. The transition follows the form: on a cylinder it runs in bands along the length, on a sphere it is a spot with a soft edge. A dark line along the rim is left on purpose, it separates the piece from the light background.
For textured surfaces frequency separation is used: the image is split into a layer with tone and a layer with fine texture. Blotches and uneven reflections are corrected on the tone layer, while brushing lines and the grain of the metal stay untouched. This way you can even out the light on a satin bracelet without losing the satin finish itself.
The typical mistake at this step is overdoing it. A perfectly smooth gradient with no irregularity looks like a render. A real reflection always has a little life: a slightly sharper edge on one side, a light reflex from below. These are kept or added back.
Step 4. Color
First the overall balance: the background and the gray card must become neutral. Then the metal and the stones separately, through masks.
Metal is convenient to correct with Selective Color or with curves in individual channels. For yellow gold the green in the shadows is removed and you make sure the highlights stay light yellow, not white with a yellow fringe. White gold and silver are checked for neutrality: there should be no blue or yellow in the highlights or the shadows. If a colored reflex from the surroundings is left on silver, it is desaturated locally without touching the rest of the frame.
The most reliable way to hit the color is to keep a reference in front of your eyes. It can be the piece itself on the desk, a frame with a color target, or an already approved photo from the same collection. When a series is processed, the color of the first approved frame is saved as a sample and all the others are checked against it.
And one more thing people forget. The retoucher's screen must be calibrated, and the finished file saved in sRGB. Otherwise the color verified on one monitor will be different on the buyer's phone.
Step 5. Stones
The stone is processed separately from the metal, on its own mask.
- Cleanup. Dust is removed from the table, along with the reflection of the lens if it landed in the center of the stone.
- Facet contrast. Light facets are made slightly lighter and dark ones slightly darker, with dodge and burn or with curves through a mask. A stone comes alive when it has the full range from nearly white to nearly black.
- Color. The shade of a colored stone is checked against the piece. Saturation is raised only inside the stone. If you raise it across the whole frame, the metal color will drift.
- Highlights. One or two bright sparks on the facets may be strengthened. Drawing star flares that were not there is not worth it: the buyer will receive a stone without them.
- Combining frames. If a separate frame was shot for the stone, it is inserted through a mask into the frame for the metal. It has to be aligned precisely along the facets and prongs, otherwise a halo appears around the stone.
When there are many stones, for example a row of twenty cubic zirconia, they are not processed by copying one good one. Identical stones are obvious at once. Each one is corrected, but quickly: a general adjustment for the whole row and spot fixes where a stone has gone completely dead.
Step 6. Volume
After cleanup and rebuilt reflections the piece often looks flat, because part of the contrast went away together with the dirt. Volume is restored with dodging and burning along the form: on a separate layer, with a soft brush at low opacity, lights are strengthened on the convex parts and shadows are deepened where details go behind one another.
A simple rule works here: light follows the form. On the round section of a shank the highlight runs along the length, on a prong it sits as a dot, on the flat top of a signet it floods the whole surface. If a highlight contradicts the form, the eye reads it as a dent.
Overall contrast is raised with curves at the very end and moderately. Metal with too much contrast loses its midtones, and gold starts to look like yellow plastic with white spots.
Step 7. Background and shadow
The piece is separated from the background with the Pen tool. Automatic selection fails on jewelry more often than on other products: light metal merges with a light background, thin links and prongs get lost, the inner gaps in a chain go unnoticed. You can get a quick starting cutout automatically, for example with the background remover, and then correct the contour by hand in the difficult places.
The background is filled with the required color, most often white or a very light gray. After cutting out, the edge of the piece is checked for a halo: a light or dark one-pixel fringe gives away careless work on any background other than the original.
The shadow is built from scratch. A soft contact shadow under the piece is painted as a dark spot with heavy blur and low opacity, denser at the point of contact and more transparent toward the edges. A mirror reflection is made from a copy of the piece flipped vertically, with a gradient mask that quickly fades it to zero. In a series the shadow settings are saved so that all listings look like one catalog.
Step 8. Sharpening and export
Sharpening is added at the very end and after resizing to the final dimensions. It is applied selectively: stone facets, engraving, edges. Smooth polished areas are left alone, otherwise noise and the remains of cleanup will show on them.
Before saving, the frame is checked once more at one hundred percent and at the thumbnail size at which the buyer will see it in search results. At the small size you check whether the silhouette reads and whether the metal has merged with the background. Then the file is converted to sRGB, brought to the platform's dimensions and aspect ratio, and saved at a quality that leaves no banding on smooth gradients. The layered working file is kept: if the client asks to change the background or the shadow, it takes minutes, not a new edit.
Specifics of different types of jewelry
Rings. The most common task. The shank is a curved mirror that shows the whole surroundings at once. The inner side is usually made calmer than the outer one so it does not compete with the front. Engraving and the hallmark inside stay sharp. If the ring stands upright, the wax or the stand at the base is removed and the lower part of the shank is painted in.
Earrings. A paired piece, and the buyer compares the left with the right. They must match in color, brightness and sharpness. Often one earring is shot face on and the other at three quarters to show the clasp. Clasps and ear wires are cleaned especially carefully: that is where most of the fine dirt collects.
Chains and bracelets. A repeating element. The temptation to copy one clean link onto all the others is strong, but identical links look unnatural. Usually a general correction is made for the whole chain, and the most visible areas and the clasp are done by hand. The gaps between links are checked: after cutting out they must become background, not stay gray.
Pendants. A thin chain next to a large pendant needs different sharpening and different cleanup. The bail and the jump ring are often out of focus, they are carefully strengthened or taken from another frame of the stack.
Watches. A discipline of its own. The crystal gives its own glare that covers the dial, it is weakened or removed completely. The hands are traditionally set to about ten past ten so they do not cover the logo. Indices and lettering must stay crisp, no softness is allowed on them. The bracelet or strap is processed separately: metal like a chain, leather like a textured material.

Pearls and cabochons. A sphere reflects the whole room and the photographer in the middle. The dark spot in the center of the bead is removed, the highlight is softened, the form is shown with a soft transition. A strand of pearls is evened out in color, but a small difference between beads is kept: absolutely identical pearls look like costume jewelry.

Brooches, filigree, complex shapes. Many small gaps and corners where dust and compound get stuck. Most of the time goes to cleanup and cutting out. Patience and good magnification matter most here.
Enamel and oxidized pieces. Enamel must keep its even color and its own soft shine. Oxidation must not be lightened: it creates the pattern, and without it the piece becomes a different one.
Working with a series: how a catalog is processed
One ring can be brought to perfection by intuition. A catalog of two hundred items needs a system, otherwise it falls apart into two hundred different pictures. This is how it is organized.
- Reference. One or two typical frames are picked from the series and finished completely. The store owner approves them. From that moment the metal color, shadow density, scale and position of the piece in the frame are the standard.
- Groups. The remaining frames are sorted by metal and by type of piece: yellow gold separately, silver separately, rings apart from chains. Within a group the color settings are almost identical.
- Transferring settings. RAW development, overall color correction and shadow settings are carried over from the reference to the whole group. This is the part of the work that costs almost nothing in a series.
- The manual part. Cleanup, reflections and stones are done on each frame separately. They cannot be copied, because dust and highlights are different in every frame.
- Checking. The finished frames are laid out in a grid on one screen. A piece that stands out in color, brightness or size is visible at once.
- File names. Frames are named by SKU and angle number. A small thing that saves hours when uploading to the platform.
This is why it matters so much that the photographer shoots the series consistently: one light, one angle, one distance. Every deviation on set turns into manual work in post and, in the end, into cost.
Catalog frame and advertising frame: what is the difference
Two different tasks are often confused, and one is ordered while the other is expected.
A catalog frame is for the product listing. Its goal is accuracy and consistency. A neutral background, honest color, a calm shadow, the whole piece. The edit follows the steps above, and time per frame is predictable.
An advertising or image frame is for a banner, a cover, a brand showcase. Its goal is impression. A complex background, a reflection on a glossy surface, water drops, fabric, colored light and several pieces in a composition are all acceptable here. Such a frame is often assembled from several shots: metal separately, stones separately, background separately. There is several times more work, and it is priced differently.
For marketplace sales you need good catalog frames first. An image shot makes sense as the second or third slide, once the base is done.


Three typical walkthroughs
To show how the steps add up to a job, here are three characteristic situations. The time is a guideline for an experienced retoucher and depends on the quality of the source.
A yellow gold ring with a colorless stone. Input: gold with a greenish tint in the shadows, a dark stripe from the tripod and a reflection of hands on the shank, dust on the stone, the stone itself gray. What we do: develop with white balance by the gray card, clean dust and fingerprints, rebuild the reflection on the shank with an even highlight and a dark line along the rim, correct the gold shade, strengthen the contrast of the facets, cut out, white background, soft shadow. About 40-60 minutes. Output: warm gold with no green, a stone with bright facets, a clean contour.
A silver chain with an onyx pendant. Input: a gray seam from the light tent in every link, the onyx flat and without a highlight, traces of wax under the piece, a background with a gradient. What we do: general cleanup, evening out the tone of the links through frequency separation, one neat highlight on the onyx following the cabochon, cutting out with all the gaps checked, a uniform background. About 40-50 minutes, almost half of it on the gaps and the clasp. Output: cool light silver, a deep black stone with a clear shape.
A watch on a steel bracelet. Input: glare on the crystal covers half the dial, the camera is reflected on the case, bracelet links differ in brightness, the frame is assembled from a stack with a halo along the contour. What we do: clean the traces of stacking, weaken the glare on the crystal and restore the dial from a neighboring frame, rebuild reflections on the case, even out the bracelet, sharpen the indices and lettering. An hour or more. Output: a readable dial, even metal on the case and bracelet.
If you want to try it yourself
A simple piece without stones can well be finished on your own. Here is the order to start with.
- Open the RAW and set the white balance by the background or a gray card. The gold will immediately get closer to the real thing.
- Create an empty layer and remove dust and lint with the Spot Healing Brush. Move across the frame in squares so you miss nothing.
- Do not try to stamp out large dirty reflections. Select the surface and lay a soft gradient from light to dark over it at low opacity.
- Correct the metal color with Selective Color. Change it little by little and compare with the piece in daylight.
- Add contrast with curves, slightly. Watch the midtones of the metal, not the background.
- Cut out the piece, place it on a white background and add a soft shadow.
- Resize to the required dimensions, add a little sharpening and save in sRGB.
Any editor with layers and masks will do. Photoshop is used most often, Lightroom or Capture One suit RAW development, and GIMP is a free option. Basic operations can also be done online without installing software, for example in the jewelry retouching tool.
Try it on your photo
Basic jewelry retouching can be done right here. Upload a shot: the tool gently cleans the metal and edges and evens out the highlights. It is a quick way to see how much of the work automation takes on and what is left for a retoucher.
Do not want to fiddle with it? Hand the photo to a retoucher
Automation does not fix everything: a difficult frame, a photo that matters, an old print off a scanner. Where the algorithm gives up, a person works the picture layer by layer in Photoshop, by hand.
 BeforeAfter⇆
- Bring back sharpness in the face and eyes
- Remove noise and artefacts without plasticising the skin
- Fix colour, contrast and a broken exposure
- Remove scratches, stains and creases from an old scan
- Return a file large enough to print
- Price per photo$10
- Turnaroundwithin 24 hours
- Deliveryto your email
- If we cannot do itmoney back
We will finish your photo by hand
A studio retoucher fixes what automation cannot: sharpness, face, colour, defects. Pay first, then simply send the photo and tell us what you need. If we cannot do it, you get your money back.
- Manual photo retouching$10
Upload a jewelry photo
JPG, PNG or WebP up to 25 MB. Works best on a cut-out photo against a light background.
Where automation ends
AI tools help with the background and basic cleanup, but on jewelry the exact color of metal and stone, the work with reflections and fine polish almost always need manual retouching. A basic cutout takes a minute, for example with the background remover, but the final pass on jewelry is better ordered from a retoucher: we have been doing product photography for years, jewelry included.
Let us look closer at what can already be trusted to automation, what cannot yet, and how to organize the work to take the best of both approaches.
What neural networks do well
- Background removal on simple shapes. A plain ring, a pendant without gaps, a watch. The contour comes out quickly and, in most cases, cleanly.
- Fine dust on even areas. Single specks on a uniform surface are removed automatically without a trace.
- Upscaling. If the source is too small for the platform's requirements, modern algorithms enlarge it more carefully than plain interpolation.
- Noise reduction. Especially useful for frames shot on a phone or in weak light.
- Rough sorting and repetitive operations. Cropping to format, centering, bringing a series to one size.
- Backgrounds and scenes for additional frames. For image slides, where the accuracy of the piece itself is handled separately.
Where automation fails on jewelry
- It cannot tell a highlight from dirt. To an algorithm a light spot on metal is just a light spot. It may remove the right highlight that holds the form and leave the reflection of the tripod.
- It invents details. Generative fill paints in stone facets, links and prongs the way it finds plausible. It looks nice, but it is a different piece now. For a product listing that is unacceptable: the buyer must receive exactly what they saw.
- It changes the metal color. Automatic color correction treats the warm tone of gold as a white balance error and "fixes" it. Rose gold turns yellow, yellow turns pale.
- It smooths texture. Noise reduction and "enhancers" take satin finish, engraving and fine oxidation for noise.
- It gets the contour wrong on complex shapes. Thin chains, filigree, gaps between links, light metal on a light background.
- It does not hold a series. Each frame is processed on its own. As a result, twenty rings from one collection get twenty slightly different shades.
- It makes stones identical. Or the opposite, turns a row of melee into a mush of highlights.
The common cause is one. A neural network is trained to make an image plausible. A jewelry listing needs not plausibility but accuracy: a specific piece, a specific shade, a specific number of stones.
Comparison by task
| Task | Automation | Human |
|---|---|---|
| Speed | Seconds per frame | From ten minutes to an hour and more |
| Clean background on a simple piece | Copes | Needed to check the contour |
| Clean background on a chain or filigree | Gives a starting cutout | Finishes the contour and the gaps |
| Dust and small specks | Copes on even areas | Near stones and edges |
| Reflections on polished metal | Does not cope | Rebuilds them by hand |
| Exact metal and stone color | Often gets it wrong | Checks against a reference |
| Live stones | Leaves them alone or invents facets | Strengthens the real facets |
| Consistent look across a series | Each frame on its own | Holds one reference for the catalog |
| Responsibility for the result | Nobody to ask | You can ask to redo a specific spot |
The hybrid process: how it works in practice
The sensible approach today is not to choose between a neural network and a retoucher but to split the work. Automation gets what it does quickly and predictably. The human keeps what the buyer's trust depends on.
- Automatically: rough background removal, basic cleanup of fine dust, bringing to size and format.
- By hand: checking and correcting the contour, rebuilding reflections, metal and stone color against the reference, work with facets, volume, shadow.
- Automatically: exporting the series to the sizes required by different platforms.
- By hand: a final look at the whole series so that all listings read as one catalog.
This makes the edit faster than a fully manual one and free of the surprises a fully automatic one brings.
How much it costs and what the price depends on
Jewelry and watches are among the most expensive categories in product retouching. Rates vary a lot between markets and studios. With us, jewelry-grade work starts from about 1 euro per photo for large uniform batches and rises with the depth of retouching: a complex one-off piece with stones costs several times more than a plain ring in a series.
If you need not only retouching but also the catalog shoot, the price is calculated per item, with several angles. How this looks in practice is described in our case study of the jewelry brand Zevira.
Several things affect the price of a specific frame.
- Complexity of the piece. A plain ring and a filigree brooch differ in time several times over.
- Number of stones. Each stone is a small separate job.
- Quality of the source. A clean studio frame is processed faster than a phone shot by the window.
- Requirements for the result. A catalog frame on white is simpler than an advertising image with a reflection and a complex shadow.
- Volume and uniformity. A series of similar pieces shot the same way costs less per frame: the settings of the first frame carry over to the rest.
- Urgency. A job "by morning" costs more than a job at a normal pace.
Time guidelines look like this.
| Piece | Time guideline | Where the time goes |
|---|---|---|
| Simple ring without stones | 10-20 minutes | Cleanup, reflection on the shank, background |
| Ring with a stone | 20-40 minutes | Plus the stone, the setting, color |
| Chain or bracelet | 30-50 minutes | Links, gaps, clasp |
| Earrings (pair) | 30-50 minutes | Matching left and right, clasps |
| Watch | From an hour | Crystal, dial, case, bracelet |
| Brooch, filigree, pave | From an hour | Fine cleanup, cutting out, many stones |
The easiest way to get an exact price for your photos is to send two or three typical frames for an estimate.
Send two or three typical frames from your catalog. We will do a test edit for free and quote a price for the batch.
Three levels of retouching: what each includes
Different studios mean different things by the word "retouching", which makes prices hard to compare. It is convenient to split the work into three levels and agree in advance which one you need.
| Level | What it includes | Where it fits |
|---|---|---|
| Basic | Background removal, cleanup of visible dust, overall color and brightness, resizing. Reflections on the metal stay as they are. | Additional slides, inexpensive fashion jewelry |
| Catalog | Everything in Basic, plus full cleanup at high magnification, rebuilt dirty reflections, exact metal and stone color against a reference, livelier stones, a consistent shadow. | The main image of a listing |
| Advertising | Everything in Catalog, plus assembling the frame from several shots, a complex background, reflections on a surface, work with composition. | Banners, covers, a brand showcase |
When you ask for an estimate, name the level or send an example of the result you want. Then the figure will relate to what you expect, not to what the studio is used to calling retouching.
How not to overpay for the edit
The cost of retouching is made of time. Anything that reduces the retoucher's time without losing quality lowers the price. Several things depend only on the client.
- A clean piece on set. A wiped piece is processed noticeably faster than a dusty one.
- A consistently shot series. One light and one angle allow settings to be carried from frame to frame.
- Selection before sending. Send only the frames that will go into the listing, not the whole shoot with duplicates.
- A clear brief the first time. Metal, stones, platform, an example of the shadow. Every round of clarification is time.
- A batch instead of single orders. Twenty photos in one order cost less than twenty orders of one.
- Different levels for different slides. Full retouching for the main image, cleanup, color and background for the additional ones.
When retouching pays off
With jewelry the price of a mistake is high. The buyer cannot hold the piece, the photo is the only proof of quality. If it raises doubt, the person leaves. If it promises more than there is, the person buys and returns, and on a marketplace a return costs the seller shipping, time and the listing's ranking.
So it is worth counting not the price of one photo but the price of one sale kept. The edit of a listing is paid for once and works for as long as the product is on sale. For a piece with a margin of a hundred dollars or more, even one extra sale a month covers the retouching of all its photos.
How to choose a retoucher
A retoucher who is good at portraits or clothing will not necessarily cope with jewelry. It is a separate skill. Here is what to look at.
- Examples of jewelry work specifically. As before and after pairs, at full size. They show that the person can build reflections, not just remove a background.
- Metal looks like metal. Look at the smooth surfaces: they have a gradual transition of light and a dark line along the edge, not a flat gray fill.
- The stones are different. If every stone has the same highlight, it is copying.
- Series, not single frames. Ask to see several pieces from one collection side by side. Consistent color and shadow across a series are harder than one striking frame.
- A test frame. It is normal practice to process one of your photos before a big batch starts. Color, shadow and the degree of cleanup are agreed on it.
- Questions for you. A good retoucher will ask about the metal, the stones, the platform and the color reference. If they ask nothing, they will be guessing.
- Revision terms. It is clear in advance how many rounds of revisions are included and what counts as a revision versus a new task.
A very low price for a jewelry frame usually means one of two things: fully automatic processing, or cleanup with no work on reflections and color. For simple pieces on additional slides that may be enough. For the main image of an expensive item it is not.
How to brief a retoucher
A good brief saves both sides a round of revisions. This is what to send along with the photos.
- Source files at maximum quality. RAW is best, otherwise an unprocessed JPEG from the camera. Not screenshots and not files from messengers that compress the image.
- Which metal and which stones. "14K rose gold, cubic zirconia" or "oxidized sterling silver, onyx". The retoucher does not see the piece and should not have to guess.
- A color reference. A photo of the piece in daylight, a frame with a color target or an already approved image from the same collection.
- Where the photos will be used. The platform, dimensions, aspect ratio, background requirements.
- Which shadow you need. Soft, a reflection, or none. If you have an example, attach it.
- What must not be touched. A signature texture, patina, features of handwork that are part of the piece, not a defect.
- Deadlines and volume. How many frames now and how many will come regularly.
How to accept the work: a short checklist
- Open the photo at one hundred percent and go over the whole piece. There should be no dust, lint, stamp traces or repeating spots.
- Put the piece next to the screen in daylight. The shade of the metal and the stone should match.
- Look at the edges. No light or dark fringe, all the gaps in the chain are cut out.
- Check the stones. They are contrasty, different, with no extra painted highlights. Their number matches the piece.
- Check the engraving, the hallmark, the lettering on the dial. They are readable and not smoothed away.
- Reduce the photo to thumbnail size as in search results. The silhouette reads, the metal has not merged with the background.
- Open the whole series side by side. Color, shadow, scale and position of the piece in the frame are the same.
- Open it on a phone. Most buyers will see the listing there.
We take the whole series: one metal color, background and shadow across all listings. We start with a test frame.
Frequently asked questions
Why are jewelry photos so difficult? Polished metal picks up reflections of the whole room, stones are fussy about color, and small details are visible in close-up. All of this calls for careful manual retouching.
Can I shoot jewelry at home? You can shoot it, yes, with a dome or a light tent. But bringing it to a listing (reflections, color, cleanliness) almost always takes retouching.
Will a neural network cope? With the background and basic cleanup, yes. The exact color of metal and stone and the work with reflections are more often finished by hand.
How important is exact color? Critical: a shift in the shade of gold or a stone makes the piece look cheaper and raises returns on an expensive item.
How long does it take to retouch one piece? A simple plain ring, 10-20 minutes. A ring with a stone, 20-40 minutes. A chain or bracelet, 30-50 minutes. Watches, brooches and pieces with pave, from an hour. Turnaround also depends on volume: a batch of a few dozen similar frames is usually done in one to three business days.
How much does jewelry photo retouching cost? Rates differ between markets and studios. With us, jewelry-grade work starts from about 1 euro per photo for large uniform batches and rises with the depth of retouching. The price is affected by the complexity of the piece, the number of stones, the quality of the source and the size of the batch. An exact figure is given after an estimate of two or three typical frames.
What is better to send: RAW or JPEG? RAW. It holds more information in the highlights and shadows and lets you correct white balance precisely. If there is no RAW, a full-size JPEG from the camera will do, without filters and without sending it through messengers that compress the file.
Can I shoot jewelry on a phone? You can, especially for additional frames and social media. For the main listing image there are limits: a phone sharpens and denoises on its own, which hurts the texture of the metal and smears fine detail. If there is no other option, shoot in a light tent, from a tripod, in a mode that saves RAW and without digital zoom.
Will the piece change after retouching? Is that honest? Honest retouching removes what a new piece does not have: dust, fingerprints, try-on scratches, dirty reflections of the room. It does not change the shape, the size, the number or the color of the stones, and it does not remove real features of the piece. If after the edit the jewelry in the photo looks the way it does in the hand in good light, everything is done right.
Which background should I choose: white, gray or black? For the main image on a marketplace a light neutral background is usually required, and Amazon expects pure white. White is the most universal, but silver and white gold are harder to show on it, they need a dark line along the contour. Light gray is softer and holds light metal well. Black is striking for diamonds and yellow gold, but suits image frames, a website and advertising better.
Does jewelry need a shadow? Almost always yes. Without a shadow the piece looks pasted into the background. A soft contact shadow gives the feeling that the ring really lies on a surface. A mirror reflection looks more expensive, but it does not suit every piece or every platform.
Why does gold come out green or gray in photos? There are three reasons: wrong white balance, colored reflections from the surroundings and mixed light from different lamps. Part of it is fixed on set by removing colored objects from the room and shooting with one type of source. The rest is corrected in post with selective color through a mask of the metal.
What if the stone looks dark and dead in the photo? On set, add a small hard source that lights up the facets and shoot a separate frame for the stone. In post, strengthen the contrast of the facets and combine that frame with the main one. There is no need to paint highlights that were not there.
What is focus stacking and why is it needed? In macro shooting only a very thin layer is sharp, and a whole ring does not fit into it. The photographer takes several frames with different focus points, and then they are merged into one that is sharp from the front edge to the back. The merge leaves small artifacts along the contour, which are removed in retouching.
Can a whole collection be processed in one style? Yes, and that is the right approach. The first frame is finished and approved, its color, shadow and scale become the reference, and the whole series is brought to it. The catalog looks consistent, and the cost of one frame in a batch is lower.
In what format are the finished photos delivered? Usually JPEG in sRGB at the dimensions of the required platform. On request we deliver PNG with a transparent background for design and banners, and versions for several platforms at once. The layered working file stays with the retoucher so the background or shadow can be changed quickly later.
How many photos does one jewelry listing need? The working minimum is four or five frames: the main one on a clean background, a second angle, a close-up of the stone or texture, the clasp or hallmark, and the piece on a person for scale. More is fine, fewer is not: the more expensive the piece, the more questions the buyer has.
Can scratches and wear be removed from the piece in the photo? Try-on marks and display micro-scratches are always removed: the buyer will receive a new piece without them. If the item is sold as vintage or pre-owned, its condition must not be changed in the photo, and the edit is limited to dust, background and color.
What is rhodium plating and does it show in photos? It is a thin rhodium coating that gives white gold and silver a bright, cool shine. In a photo a rhodium-plated piece looks lighter and cleaner than plain silver, and that shade should be preserved, not made "warmer for beauty".
Do photos for social media need the same careful processing? No. In a feed a frame is seen for a second on a small screen, mood and composition matter more there. Cleanup, color and overall brightness are enough. Full retouching with rebuilt reflections is needed where the piece is examined and a purchase decision is made: in the product listing and on the website.
What if the color differs between a phone and a computer after retouching? A small difference between screens always exists, it cannot be removed. To keep it minimal, the file is saved in sRGB, and the color is checked on a calibrated monitor and additionally on a couple of ordinary phones. If the shade drifts noticeably on one device only, the cause is its screen, not the photo.
Can the metal color be changed in the photo, for example to show a ring in yellow and in white gold? Technically yes, and it is sometimes done for catalogs with several versions. But recolored metal looks convincing only with careful manual work: not just the shade changes, but also the character of highlights and shadows. And the version must actually exist, otherwise the buyer receives something different from what they ordered.
How many rounds of revisions are usually needed? With a clear brief and an approved reference, one, rarely two. More revisions appear when color and shadow were not agreed on a test frame and each side imagined the result in its own way.
Where do I start if I need jewelry photos retouched? Send two or three typical frames and tell us which metal it is and where the photos will be used. From them the complexity, price and turnaround become clear. Simple operations like background removal can be done on your own in online tools, while the final jewelry retouching is better left to a professional.
A difficult case, an important photo or simply no time? Our retoucher will finish the image by hand for your task.
We will edit a sample from your catalog for free
For online stores, manufacturers, brands and wholesale suppliers. Send 1-3 product photos and we will return them professionally edited, with a price quote for your whole catalog.
This is a b2b, volume format. We do not process personal photos (portraits, events, documents) here.
Request received
We will edit your sample and send the result with a catalog quote within one business day.