ID photo maker online: how to make an ID picture with a website, app or studio
ID photo maker online: how to make an ID picture with a website, app or studio
ID photo maker online, app or studio: where to make an ID photo
You can make an ID photo yourself in 10-15 minutes: take a picture on your phone against a light wall in daylight, upload it to an online service, pick your document and get a file of the right size. A studio is the better choice in two cases: when the authority accepts only printed photos of a set print quality, and when you would rather have a person check the shot for you. Below you will find how to choose between the three options, how to shoot at home, what is free and what a good photo looks like.
There are three ways to get the picture: an online service in the browser, an app on your phone, and a photo studio or booth. For an online application the first two are more convenient, because you get a file straight away. For a paper application a studio is safer, or a file that you later print at a photo lab.
Photo ID online in the browser: when a website is enough
A website is enough when the document is applied for over the internet and the authority itself lets you upload your own picture. That is how the UK online passport application works, and so do most electronic visas.
The process is simple. You open the page, upload a picture or take one with the camera, choose the document, and the service crops the frame to the standard and adjusts the file size. There is nothing to install, and the site opens on both a computer and a phone.
The ID photo tool on gdefoto.com follows this pattern. It accepts JPEG, PNG, WebP, HEIC and AVIF files of up to 20 MB, crops the frame for the chosen document, cleans up the background, evens out the white balance and brings the pixel size and file weight within the limit of the format.
Photo ID app on your phone: do you need to install one
No, installing an app is optional: a website with a camera in the browser does the same job. An app makes sense if you take document photos often, for example if you apply for visas for the whole family several times a year.
Before you install anything, check three things:
- Whether the app has your exact document and country, not just a general "passport" option.
- At which step it asks for payment: before processing, after the preview or when you save.
- Which permissions it asks for. A document photo needs the camera and access to your pictures. It does not need your contacts or your location.
ID photo app or website: which one to choose
Choose the website if you need one or two photos, and an app only if you come back to it regularly. The result is the same kind of file in both cases, so the real difference is the time spent on installing and the way you pay.
gdefoto has no separate app. The tool opens in the phone browser, can shoot with the front camera and shows an oval for the face and lines for the eyes and chin on the screen. For a detailed home routine, see the guide on how to take a document photo at home on a phone.
ID photo near me: when a studio or booth is worth the walk
Go to a studio when you need printed photos under strict print rules. Examples from official requirements:
- Australia accepts passport prints made only by dye sublimation on heavy glossy paper. A print from an inkjet printer will not do.
- The Netherlands requires a printed 35×45 mm photo for a passport or ID card with a print resolution of at least 400 dpi.
- The UK states directly that photos from a booth or shop are approved more often than photos taken on your own device. A booth or shop can give you a code that you enter in the online application instead of a file.
One more point in favour of a studio: you are photographed by a person who sees shadows, a tilted head and glare on glasses straight away.
Photo ID near me or online: how to decide
Decide by what the authority accepts: a file or paper. If the application form has an upload field, an online service saves you the trip. If the instructions ask for prints with a set paper type or print method, search for a studio nearby and ask for a digital copy as well, so that one visit covers both needs.
If there is no studio near you, take the picture at home, process it online and send the file to any photo lab or photo printing service. Check in advance whether the authority sets the paper type and the print method.
ID photo maker comparison: website, app and studio side by side
The table shows what you get from each option and what it is suited for.
| Criterion | Online service | App | Studio or booth |
|---|---|---|---|
| What you get | a file | a file | printed photos, sometimes a file or a code |
| What you need | a phone or computer with a browser | a phone and an install | to go there and wait |
| Cropping to the standard | automatic for the chosen document | automatic | done by the photographer |
| Background | depends on the service; in the gdefoto tool it is white, with red and blue in the Indonesian formats | depends on the app | any colour the document requires |
| Retakes | as many as you like, at home | as many as you like | usually one or two |
| Printing | separately, at a photo lab | separately | on the spot |
| Best for | online applications and visas | frequent photos | paper applications with strict print rules |
When you do not need your own photo at all
Some documents do not ask you to bring a photo: you are photographed at the office. In that case a home picture is needed only for the form, or not at all.
- Indonesia, the electronic KTP card: the picture is taken when your biometric data is recorded at the civil registry office. The background colour there depends on the year of birth: red for odd years, blue for even years. This is reported by Indonesian media with reference to the civil registry, Dukcapil.
- Russia, the biometric foreign travel passport: a photo is uploaded with the online form, but it does not go into the passport itself, because an officer photographs you at the appointment.
Before you shoot anything, open the instructions of your authority and see whether it needs a file, paper prints or simply a personal visit.
How to take an ID picture at home on a phone
You need a plain light wall, a window with daylight, a phone and a second person. The whole process takes a few minutes if you prepare the place in advance.
Background for an ID picture: a wall, a sheet or paper
Stand in front of a plain light wall, about half a metre (20 inches) away from it, so that the shadow of your head does not fall on the background. If there is no suitable wall, a white bed sheet without creases or a large sheet of paper will do.
What background the authorities ask for:
| Document | Background in the official requirements |
|---|---|
| UK passport, digital photo | plain and light |
| UK passport, printed photo | plain cream or light grey |
| Dutch passport and ID card | light grey, light blue or white, in one tone |
| Australian passport | white or light grey, in contrast with the face |
| US visa | white or off-white |
| Indian voter ID, Form 6 | white |
| Indonesian civil service application (SSCASN) | red |
The gdefoto tool replaces the background itself, so any light wall is enough at home. Keep in mind one caveat: some countries, including the USA, the UK and the Netherlands, do not allow the background or the picture to be changed by software. For their documents shoot against a real plain wall that already meets the rule, so that nothing has to be replaced.
Light: how to remove shadows from the face and the wall
Stand facing a window in the daytime: this gives even light without hard shadows.
- Do not shoot under a ceiling lamp: it gives shadows under the eyes and nose.
- Do not stand sideways to the window: one half of the face will come out dark.
- Turn off the flash: it causes glare on the skin and glasses, and red eyes.
- If the light from the window is harsh, draw a thin curtain.
If the frame still looks dull or soft after that, the cause is usually the light, not the camera. The article on how to improve photo quality explains what can be fixed afterwards and what is easier to reshoot.
Camera, distance and who takes the picture
Ask another person to take the picture with the main camera of the phone from 1.5-2 metres (5-6.5 feet), holding the phone at the level of your eyes. At arm's length the front camera distorts the proportions of the face, and the frame often ends up tilted.
The UK passport office puts this rule firmly: when you use your own device, another person must help you. It also asks that the frame includes your head, shoulders and upper body, and that you do not crop the picture yourself, because the system does the cropping.
If there is no helper, put the phone on a shelf or a tripod and switch on the timer. Leave spare room around the head and shoulders: the service will cut off what is not needed.
Face, glasses, head covering and clothes
Look straight into the lens with a neutral expression, mouth closed, eyes open and clearly visible. This is a common requirement of almost every authority.
Glasses and head coverings:
| Document | Glasses | Head covering |
|---|---|---|
| UK passport | only if you need them, not dark or tinted | not allowed, except for religious or medical reasons |
| Dutch passport and ID card | allowed if the eyes are fully visible and the lenses are clear | not allowed, except for religious reasons or hair loss caused by illness |
| Australian passport | not allowed | check the instructions of the authority |
| US visa | not allowed since 1 November 2016 | check the instructions of the authority |
The simplest solution is to take your glasses off: then the picture suits any of these documents. Move your hair away from your face so that its edges are visible. Choose clothes that contrast with the background: a white shirt against a white wall blends in.
Taking a photo ID online with the browser camera
You do not have to take the picture in advance. You can shoot yourself right on the tool page: the camera button switches on the webcam or the front camera of the phone. An oval for the face and lines for the eyes and chin appear on the screen, and they make it easy to position your head.
This way works when you have no helper and the laptop or phone can be placed at eye level. If someone can take the picture for you, a frame from the main camera of the phone will be sharper.
How to check the ID picture before processing
Check five things before you upload the picture:
- Sharpness: eyelashes and eyebrow hairs are visible.
- Tilt: the eyes are on one horizontal line and the head is not turned.
- Shadows: there is no shadow on the face or behind the head.
- Spare room: there is free space around the head and shoulders.
- Size: the short side of the picture is at least 900 pixels. At 600-900 pixels the tool warns about low resolution, and a picture smaller than 600 pixels does not pass the preliminary check.
Take five or six shots and choose the best one. Do not send a screenshot or a photo saved from a messenger: they are heavily compressed.
How recent the picture has to be
Use a new picture, not one from last year. The Netherlands, Australia and the USA accept photos that are no more than 6 months old, and the UK online application asks for a picture taken in the last month. If your look has changed since the last photo, reshoot even when the old file is still within the limit.
Do not want to fiddle with it? Hand the photo to a retoucher
Automation does not fix everything: a difficult frame, a photo that matters, an old print off a scanner. Where the algorithm gives up, a person works the picture layer by layer in Photoshop, by hand.
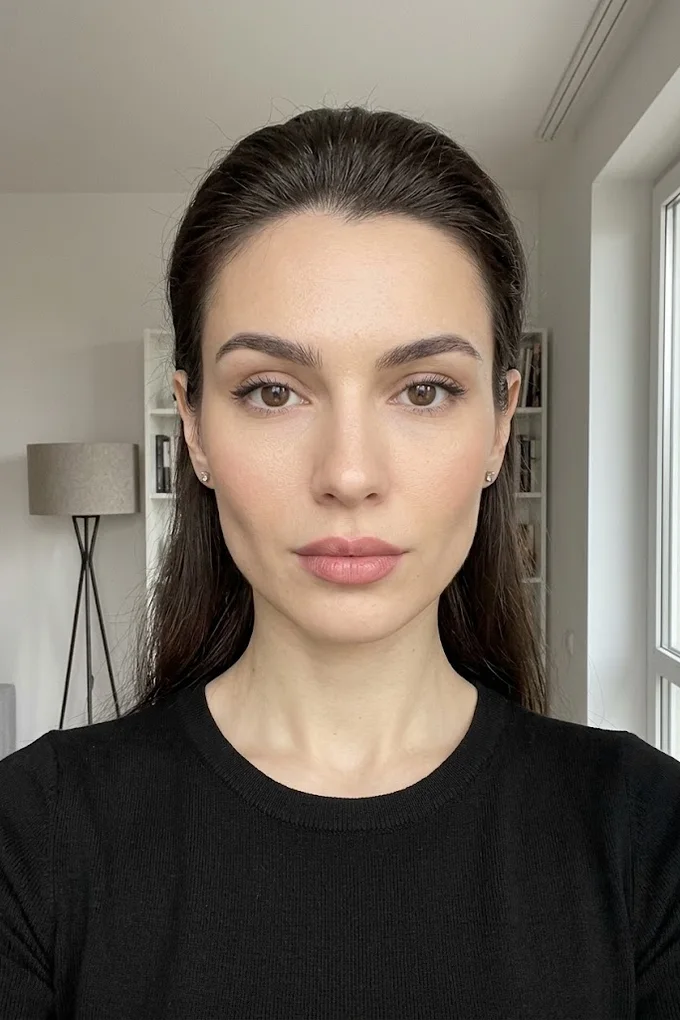
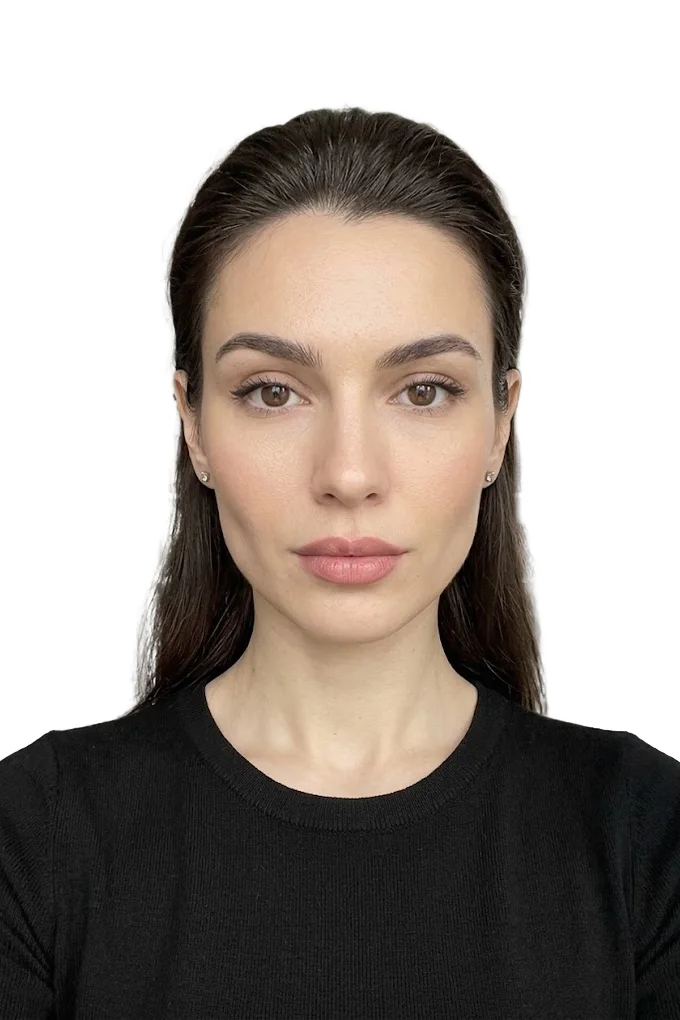 BeforeAfter⇆
- Bring back sharpness in the face and eyes
- Remove noise and artefacts without plasticising the skin
- Fix colour, contrast and a broken exposure
- Remove scratches, stains and creases from an old scan
- Return a file large enough to print
- Price per photo$10
- Turnaroundwithin 24 hours
- Deliveryto your email
- If we cannot do itmoney back
We will finish your photo by hand
A studio retoucher fixes what automation cannot: sharpness, face, colour, defects. Pay first, then simply send the photo and tell us what you need. If we cannot do it, you get your money back.
- Manual photo retouching$10
How to finish the photo online: crop, background and file size
A good source frame still has to be cropped to the standard of the document, given an even background and fitted into the file limit of the form. The service does this, and the only thing you do by hand is choose the document.
ID photo maker step by step: four actions in the tool
The whole processing takes four steps:
- Upload a file or take a picture with the camera.
- Find your document in the list of formats, which has a search field. Guides appear on the frame: top of the head, eyes, chin.
- Look at the check block: format selected, resolution of the source, head tilt, whiteness of the background.
- Press the process button.
In the result you see the before and after pictures, can compare them with a slider and read the line that states the size in millimetres, the size in pixels and the maximum file weight the photo was prepared for.
Photo ID editor: what you can adjust and what you cannot
You can adjust geometry and light, but you cannot change your appearance. The pro mode offers rotation by 90 degrees, fine rotation within 15 degrees, zoom and shift, brightness, contrast, white balance, saturation and an auto setting.
The tool does not retouch the face and does not draw clothes. That is correct in terms of the rules: the Netherlands requires that the photo is not altered by software, and the USA forbids digital editing of a visa photo. Moles, scars and wrinkles must stay, because the photo has to look like you today.
Which format to choose in the list
Choose the line that matches your document, and if there is none, the line with the same size in millimetres. The catalogue of the tool now has 58 formats. These are the ones most often needed for ID photos:
| Format in the tool | Size, mm (inches) | Pixels | File weight, up to |
|---|---|---|---|
| Schengen visa (any country) | 35×45 (1.4×1.8) | 600x800 | 480 KB |
| United Kingdom, visa | 35×45 (1.4×1.8) | 600x800 | 240 KB |
| United Kingdom: passport (online application) | digital file, 4:5 | 900x1125 | 50 KB - 5 MB |
| Netherlands: passport / ID card | 35×45 (1.4×1.8) | 630x810 | up to 1000 KB |
| US visa (DS-160) / Green Card | 51×51 (2×2) | 600x600 | 240 KB |
| India (eVISA) | 50×50 (2×2) | 900x900 | 1000 KB |
| Indonesia (eVOA / VITAS) | 40×60 (1.6×2.4) | 472x708 | 200 KB |
| Singapore (ICA eVisa) | 35×45 (1.4×1.8) | 400x514 | 1000 KB |
| Philippines (eVisa) | 35×45 (1.4×1.8) | 413x531 | 1000 KB |
| Australia (eVisa subclass 600) | 35×45 (1.4×1.8) | 413x531 | 1000 KB |
These are the parameters of the tool catalogue. Before you apply, compare them with the form of your authority, because portals sometimes change their limits. For example, the UK online passport application accepts photos that are at least 600 pixels wide and 750 pixels high and weigh from 50 KB to 10 MB, and the Singapore ICA asks for 400x514 pixels.
You cannot enter a custom size in millimetres in the tool: you can only choose a format from the list. Full size tables are in the guide to visa photo sizes and requirements by country, and the US rules are covered separately in the article on Green Card photo requirements.
Indonesian ID photo sizes 2x3, 3x4 and 4x6
In Indonesia a document photo is named by the size of the print in centimetres: 2×3, 3×4 or 4×6. Which one you need is always written in the document list of the particular organisation. There is no single official standard for these sizes: it is a commonly used designation.
An official example: the file list for the civil service recruitment portal SSCASN, published by a regional personnel office, asks for a recent 3x4 photo on a red background, as a JPG or JPEG file of no more than 200 KB.
The gdefoto tool has all three Indonesian sizes: 2×3, 3×4 and 4×6 cm, each of them on a red and on a blue background, with a file of up to 200 KB. The 40×60 mm visa format, Indonesia (eVOA / VITAS), is a separate line.
Dutch ID card photo and the general 3×4 cm format
The Netherlands uses one size for both the passport and the ID card: 35×45 mm. The tool has a line for it, Netherlands: passport / ID card. Remember that Dutch rules ask for a printed photo at 400 dpi or more and do not allow changes made by software, so take the picture against a real light grey, light blue or white wall.
For cards with no country standard there is a general line, Photo 3×4 cm (ID card, badge, student card). It suits student cards, badges and passes where the organisation simply asks for a 3×4 photo.
ID maker or photo maker: can the tool produce the card itself
No, the tool prepares only the photograph, not the card. It does not draw a card layout, does not insert the photo into a card template and does not print plastic.
If you need the card itself, the order is as follows: first a photo that meets the requirements of the organisation, then a layout in a design program or in the service of a print shop, then printing on plastic. Government IDs are issued only by the authority, and you cannot make them yourself.
How to print the finished file
The tool gives you a single photo. It has no print sheet with several pictures on it. To get paper photos, take the file to a photo lab and ask them to print it at the required size in millimetres, without fitting it to the paper format.
Check the requirements for the print first. If the authority sets the print method and the paper type, as the Australian passport office does, or the print resolution, as the Netherlands does, a home printer will not do.
What to do if the form rejects the file as too heavy
Do not compress the picture until it loses sharpness. First crop the frame to the right proportions, then reduce the size in pixels, and only after that lower the JPEG quality. The tool does this for the formats in its list. For other cases, see how to reduce photo file size without losing quality.
Free photo ID: what is free, what is paid, and examples of good and bad photos
Almost everywhere you can upload a photo and see the result for free. Payment is usually taken for the finished file, the print or the delivery. A completely free path also exists: shoot the picture yourself and crop it by hand, but then you are the one responsible for meeting the standard.
Free photo ID services: what is usually free and what is not
In most services the upload, the automatic cropping and the preview are free. The paid part differs from one service to another: downloading the final file, a print sheet, a check by a person, delivery of prints.
Before you upload a picture, find the answer to one question on the page: what exactly am I paying for, and when. If there is no answer and the price appears only at the last step, that is a reason to choose another service.
Photo ID online in the gdefoto tool: what you get for free
Processing and the preview of the result are free: you see how the frame is cropped for the document, what the background has become, and compare the before and after pictures. The clean file for download is paid.
The advantage is that you pay for a specific result. First you make sure that the face sits in the frame as it should, and only then do you download. If you do not like the picture, reshoot it and process it again in the online ID photo maker.
Free ID photo app: what to look at before you install
A free install does not mean a free result. The app description in the store has a line about in-app purchases, and reviews usually mention the step at which money is asked for.
Look at three signs:
- whether there is a subscription with automatic renewal instead of a one-off payment;
- whether the file is saved at full resolution without payment;
- whether the app names a specific country and document with its sizes.
A subscription for the sake of one picture is poor value: it is easy to forget to cancel it.
The fully free path: cropping by hand in a photo ID editor
You can do without services: crop the frame in any photo editor with the right aspect ratio and save it as a JPEG. For 35×45 mm the ratio is 7:9, and for 50×50 mm (2×2 inches) it is a square.
The difficulty is that authorities set not only the size of the photo but also the size of the face in it. The UK requires that on a printed 35×45 mm photo the distance from the top of the head to the chin is 29-34 mm, Australia asks for 32-36 mm, and the Netherlands for 26-30 mm for people aged 11 and over. By hand you would have to measure this with a ruler in the editor. For such a check the Dutch agency RvIG publishes a photo matrix: a template with the allowed position of the face and eyes.
When paying a studio is the better deal
A studio is the better deal when you need several printed copies at once, and when the document is expensive and urgent, so that a mistake in the picture means applying again.
A useful habit is to ask the studio for a digital copy of the same shot. One session then covers both the paper photos and the file for the online form.
ID picture example: what a good photo looks like
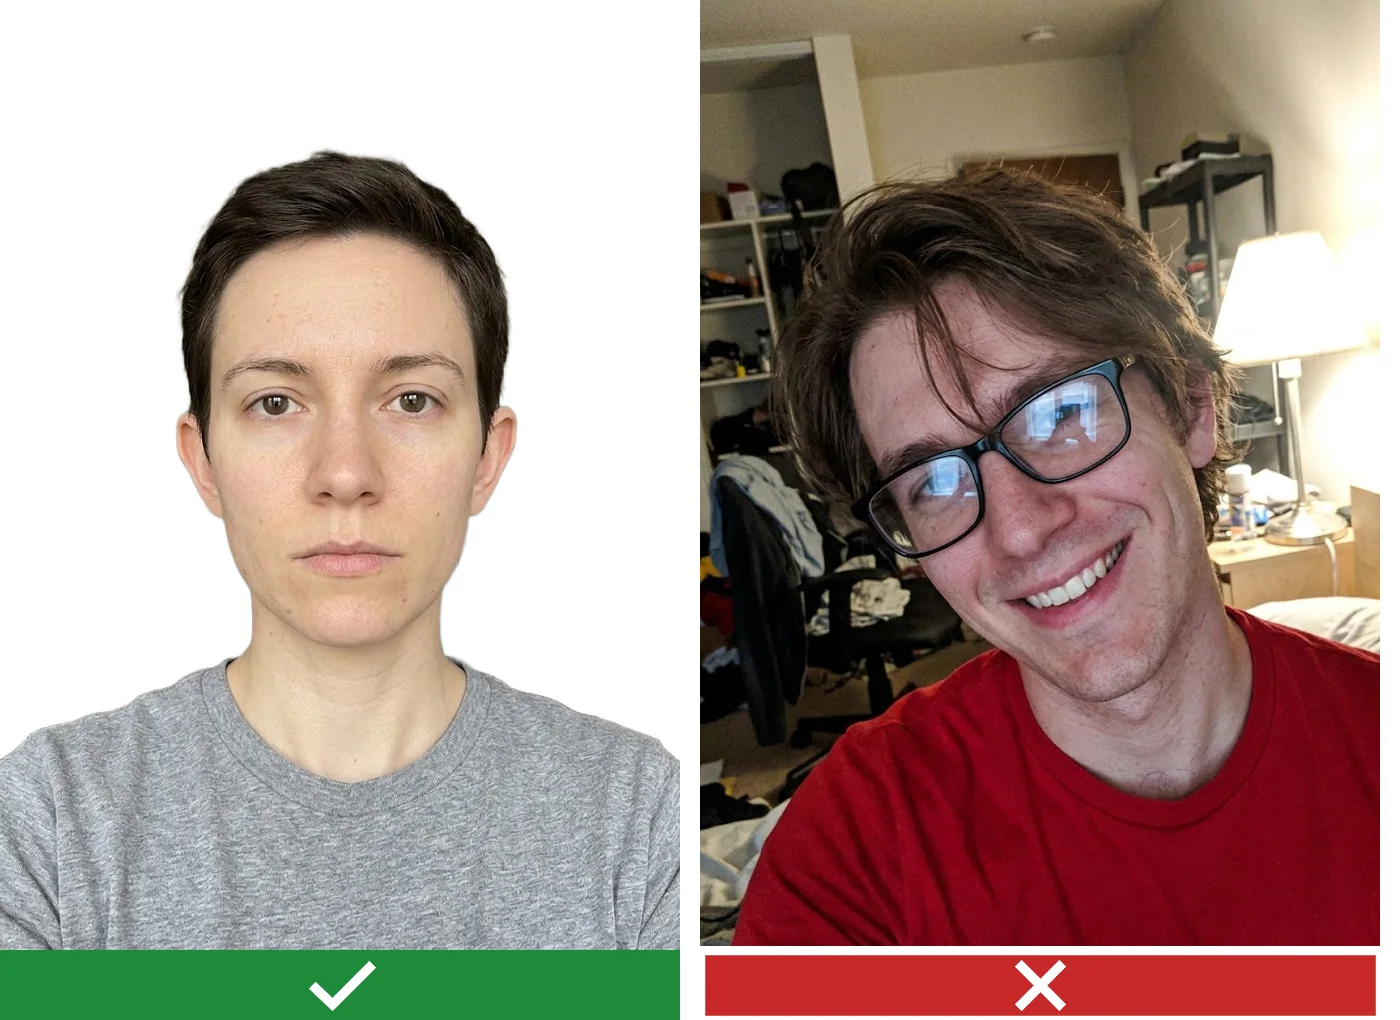
A good ID photo looks plain: even light, the face straight on and in the centre, a neutral expression, a background in one tone. Everything that makes a portrait expressive counts as a mistake on a document.
Compare your frame with this list:
- the face and shoulders are turned straight to the camera, and the head is not tilted;
- the eyes look into the lens and are open, and the mouth is closed;
- the light is even, and both halves of the face are lit equally;
- the background is plain, with no shadows, creases or objects;
- the edges of the face are visible, and hair does not cover the eyes;
- the picture is sharp, and the colours are natural, with no filters;
- there is space above the head and at the sides.
A rejected ID picture: common mistakes and how to fix them
Most rejections come from the same five or six mistakes. Almost all of them are fixed by reshooting, not by editing.
| Mistake | Why it is not accepted | What to do |
|---|---|---|
| Selfie at arm's length | distorted proportions, tilted frame | ask someone to shoot from 1.5-2 metres |
| Shadow on the wall behind the head | the background must have no shadows | step half a metre away from the wall and face the window |
| Glare on glasses | the eyes must be visible | take the glasses off |
| Smile, slightly open mouth | a neutral expression is required | relax the face and close the lips |
| Head tilted or turned | the face must be straight on | bring the eyes to one horizontal line |
| Old photo | a recent one is required | reshoot |
| Filters, retouching, beauty modes | the photo must not be altered by software | shoot with the ordinary camera |
| Photo from a messenger or a screenshot | few pixels, heavy compression | upload the original from the phone |
ID card and staff badge photo: how it differs from a passport photo
For a national ID card it usually does not differ at all: the Netherlands, for example, applies the same requirements to an ID card photo as to a passport photo, 35×45 mm. Differences appear with company and institutional cards, where the organisation itself sets the size and the background.
There is no single standard for a staff badge photo: the requirements are set by the employer or the pass office. Usually it is the same business portrait, straight on and on a plain background. What to ask before you shoot:
- Whether a file or a printed photo is needed, and of what size.
- What background: white, grey or a company colour.
- Whether there are rules on clothes: a uniform or business style.
- In what file type and with what maximum weight to send the file.
In the tool catalogue choose Photo 3×4 cm (ID card, badge, student card) or any 35×45 mm line, depending on the size the company asks for. If a company colour background or a non-standard size is required, the tool will not help, and a studio is the way to go.
ID maker basics: the size of the card itself
Plastic passes are usually made in the format of a bank card. This is the ID-1 format of the ISO/IEC 7810 standard: according to reference data, 85.60×53.98 mm (about 3.37×2.13 inches). Bank cards and many national ID cards are issued in the same format.
The photo takes up a small field on such a card, so fine details are lost. That makes even light and contrast between the face and the background all the more important.
Photo for a job or civil service application
For online forms the main thing is not the size of the print but the weight and type of the file. The Indonesian example was given above: a 3x4 photo on a red background, JPG or JPEG up to 200 KB. A selfie with the ID card and the registration card is attached to the same application, also up to 200 KB.
The Indonesian 3×4 format on a red background in the tool is prepared for this limit of 200 KB. For other forms, read the file rules of the portal first and choose the closest format by size in millimetres.
Frequently asked questions
Can I make an ID photo myself, without a studio? Yes, if the authority accepts a file or sets no special print requirements. Take the picture at home by the rules in this article and process it online. For a paper application with strict print rules, as in Australia, a studio is safer.
Will a selfie do for an ID picture? It is better not to use one. At close range the face is distorted, and the UK passport office directly requires another person to help you when you use your own device. Ask someone to shoot from 1.5-2 metres or put the phone on a support with a timer.
Do I need to install a photo ID app? No. The gdefoto tool opens in the phone browser and shoots with the front camera right on the page. The site has no separate app.
Is it a free photo ID service? Processing and the preview are free, and the clean file for download is paid. You see the result first and only then decide whether to download it.
What file can I upload? JPEG, PNG, WebP, HEIC, HEIF or AVIF of up to 20 MB. The short side of the picture must be at least 600 pixels, and 900 or more is better.
Can I get a red or blue background, and is there a 3x4 format? Yes. The catalogue has Indonesian formats 2x3, 3x4 and 4x6 cm, each on a red and on a blue background, with a file of up to 200 KB, and a general Photo 3x4 cm format for ID cards, badges and student cards. Other formats use a white background, and a custom size cannot be entered.
Can the tool work as an ID maker and produce the card or staff badge itself? No, the tool makes only the photograph. The layout and printing of the card are done by the organisation that issues it or by a print shop.
What if there is no ID photo studio near me? Take the picture at home and process it online, and for prints send the file to any photo lab or photo printing service. Check in advance whether the authority sets the paper type and the print method.
We will edit a sample from your catalog for free
For online stores, manufacturers, brands and wholesale suppliers. Send 1-3 product photos and we will return them professionally edited, with a price quote for your whole catalog.
This is a b2b, volume format. We do not process personal photos (portraits, events, documents) here.
Request received
We will edit your sample and send the result with a catalog quote within one business day.